The first week:
We commenced work on the project after compiling all of the necessary information and determining the components that were needed. Therefore, we have set some goals for our first week which is to: - Program the Arduino to receive data from a single ultrasonic sensor and calculate the distance.
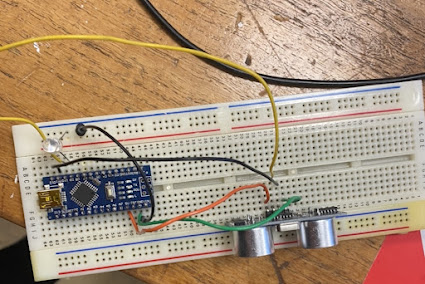
- Begin testing a basic circuit of distance measuring. This is to better our understanding of ultrasonic sensors and how they operate.
- Install the sensor and Arduino Nano to the test frame that was 3D printed
A plastic frame as shown in figure 1 was designed using Fusion360 prior to the start of the week to be printed.
Figure 1. 3D design of our initial frame
The circuit design from figure 2 consists of an ultrasonic sensor, 2 speakers, and an Arduino Nano. The ultrasonic sensor would measure the time it takes for a transmitted ultrasonic frequency to be received again. Then, it would relay the data to the Arduino where the program computes the distance. The distance is calculated by using the known speed of sound and the time of the transmitted ultrasonic frequency.
- Program the Arduino to receive data from a single ultrasonic sensor and calculate the distance.
- Begin testing a basic circuit of distance measuring. This is to better our understanding of ultrasonic sensors and how they operate.
- Install the sensor and Arduino Nano to the test frame that was 3D printed
A plastic frame as shown in figure 1 was designed using Fusion360 prior to the start of the week to be printed.
Figure 1. 3D design of our initial frame
The circuit design from figure 2 consists of an ultrasonic sensor, 2 speakers, and an Arduino Nano. The ultrasonic sensor would measure the time it takes for a transmitted ultrasonic frequency to be received again. Then, it would relay the data to the Arduino where the program computes the distance. The distance is calculated by using the known speed of sound and the time of the transmitted ultrasonic frequency.
This week's accomplishments:
- The Arduino was programmed with code for a single ultrasonic sensor.
- Distance measurement was correct and operational.
- The circuit was installed to a frame.
Figure 3. Basic test circuit for distance measurement using an LED instead of a speaker
Figure 4. Operating obstacle detecting glasses with measurements on laptop screen
When testing the glasses, we took notice of the current limitations of the project. Although obstacle detection was working well, it was only towards the front of the person wearing it. Meaning that if an object was slightly to the sides of the person, they could bump into it without it being detected.
How the issue will be solved:
Two additional sensors will be added to the circuit design, one sensor would be angled slightly to the right, and the other to the left.
.png)


Comments
Post a Comment